<div class="card card-block" ccCardHover>...</div>Creating a custom directive
Table of Contents
Learning Objectives
-
Know how to create a basic directive using the @Directive decorator.
-
Know ho to use selectors to associate an element with a directive based on an attribute.
-
Know how to interact with the raw DOM element of the associated element from the directive.
Directive decorator
We create directives by annotating a class with the @Directive decorator.
Lets continue with our joke example app and create a directive which shows the punchline of the joke when the user hovers over the card.
We’ll call our directive ccCardHover and we’ll attach it to the card block like so:
Tip
The Angular team recommends using directives as attributes, prefixed with a namespace. We’ve prefixed our directive with the namespace 'cc'.
Lets create a class called CardHoverDirective and use the @Directive dectorator to associate this class with our attribute ccCardHover, like so:
import { Directive } from '@angular/core';
.
.
.
@Directive({
  selector:"[ccCardHover]"
})
class CardHoverDirective { }
Attribute selector
The above code is very similar to what we would write if this was a component, the first striking difference is that the selector is wrapped with `[]`.
To understand why we do this we first need to understand that the selector attribute uses CSS matching rules to match a component/directive to a HTML element.
In CSS to match to a specific element we would just type in the name of the element, so input {…}`or `p {…}.
This is why previously when we defined the selector in the @Component directive we just wrote the name of the element, which matches onto an element of the same name.
If we wrote the selector as .ccCardHover, like so:
@Directive({
  selector:".ccCardHover"
})
class CardHoverDirective { }
Then this would associate the directive with any element that has a class of ccCardHover, like so:
<div class="card card-block ccCardHover">...</div>We want to associate the directive to an element which has a certain attribute.
To do that in CSS we wrap the name of the attribute with [], and this is why the selector is called [ccCardHover].
Directive constructor
The next thing we do is add a constructor to our directive, like so:
import { ElementRef } from '@angular/core';
.
.
.
class CardHoverDirective {
  constructor(private el: ElementRef) {
  }
}
When the directives component gets instantiated Angular injects an instance of something called ElementRef into the constructor.
Note
How this works is called called Dependency Injection, it’s a really important aspect of Angular and we discuss this in detail in a later section.
The ElementRef gives the directive direct access to the DOM element upon which it’s attached.
Let’s use it to change the background color of our card to gray.
ElementRef itself is a wrapper for the actual DOM element which we can access via the property nativeElement property, like so:
el.nativeElement.style.backgroundColor = "gray";This however assumes that our application will always be running in the environment of a browser.
Angular has been built from the ground up to work in a number of different environments, including server side via node and on a native mobile device. So the Angular team has provided a platform independent way of setting properties on our elements via something called a Renderer.
script.ts
import { Renderer } from '@angular/core';
.
.
.
class CardHoverDirective {
  constructor(private el: ElementRef,
              private renderer: Renderer) { (1)
    renderer.setElementStyle(el.nativeElement, 'backgroundColor', 'gray'); (2)
  }
}-
We use Dependency Injection (DI) to inject the
rendererinto our directives constructor. -
Instead of setting the background color directly via the DOM element we do it by going through the
renderer.
Important
In the future if we wanted to render our application on a platform other than a web browser then the
Renderer calls the appropriate functions to change the background color on that platform. We are not limited to only being run in a web browser with a DOM.
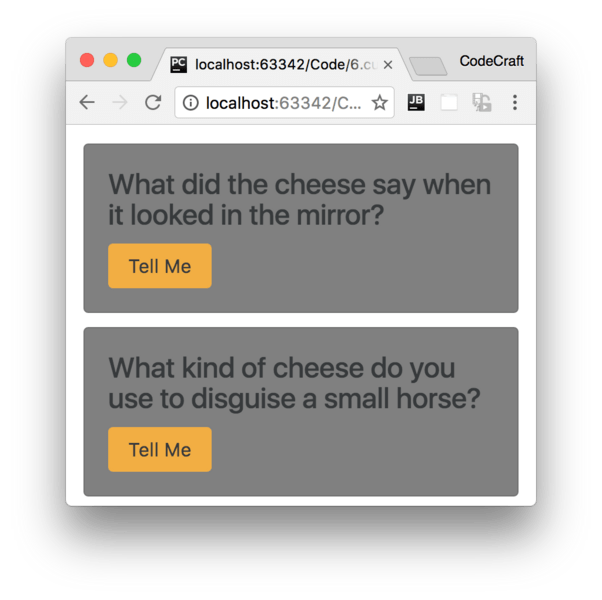
Running the application now show this:
Summary
We create a directive by decorating a class with the @Directive decorator.
The convention is to associate a directive to an element via an attribute selector, that is the name of the attribute wrapped in [].
We can inject a reference to the element the directive is attached to constructor. Then via a renderer we can interact with and change certain properties of the element.
The above is a very basic example of a custom directive, in the next lecture we’ll show you how you can detect when the user hovers over the card and a better way of interacting with the host element.
Listing
script.ts
import {platformBrowserDynamic} from '@angular/platform-browser-dynamic';
import {
    Component,
    Directive,
    Renderer,
    ElementRef,
    NgModule,
    Input,
    Output,
    EventEmitter
} from '@angular/core';
import {BrowserModule} from '@angular/platform-browser';

class Joke {
  public setup: string;
  public punchline: string;
  public hide: boolean;

  constructor(setup: string, punchline: string) {
    this.setup = setup;
    this.punchline = punchline;
    this.hide = true;
  }

  toggle() {
    this.hide = !this.hide;
  }
}


@Directive({
  selector: "[ccCardHover]"
})
class CardHoverDirective {
  constructor(private el: ElementRef,
              private renderer: Renderer) {
    //noinspection TypeScriptUnresolvedVariable,TypeScriptUnresolvedFunction
    renderer.setElementStyle(el.nativeElement, 'backgroundColor', 'gray');
  }
}

@Component({
  selector: 'joke',
  template: `
<div class="card card-block" ccCardHover>
  <h4 class="card-title">{{data.setup}}</h4>
  <p class="card-text"
     [hidden]="data.hide">{{data.punchline}}</p>
  <a (click)="data.toggle()"
     class="btn btn-warning">Tell Me
  </a>
</div>
  `
})
class JokeComponent {
  @Input('joke') data: Joke;
}

@Component({
  selector: 'joke-list',
  template: `
<joke *ngFor="let j of jokes" [joke]="j"></joke>
  `
})
class JokeListComponent {
  jokes: Joke[];

  constructor() {
    this.jokes = [
      new Joke("What did the cheese say when it looked in the mirror?", "Hello-me (Halloumi)"),
      new Joke("What kind of cheese do you use to disguise a small horse?", "Mask-a-pony (Mascarpone)"),
      new Joke("A kid threw a lump of cheddar at me", "I thought ‘That’s not very mature’"),
    ];
  }
}


@Component({
  selector: 'app',
  template: `
<joke-list></joke-list>
  `
})
class AppComponent {
}

@NgModule({
  imports: [BrowserModule],
  declarations: [
    AppComponent,
    JokeComponent,
    JokeListComponent,
    CardHoverDirective
  ],
  bootstrap: [AppComponent]
})
export class AppModule {
}

platformBrowserDynamic().bootstrapModule(AppModule);